|
|
Preparing Graphics for The Web
Introduction | JPEG File Format | GIF File Format | Which Format to Use | Display Types | Tips and Tricks
JPEG FILE FORMAT
JPEG stands for Joint Photographic Experts Group. The compression method invented by this committee is widely used today, most commonly in the form of JFIF (JPEG File Interchange Format) files. Their goal was to reduce the filesize of natural, photographic-like true-color images as much as possible without affecting the quality of the image as experienced by the human sensory engine. Clearly, they've achieved that goal with honors. I've reduced TIFF files to as little as 1/40th of the original filesize with little or no loss of perceived image quality. It seems that the target of the format was quite specific. The subject matter best suited for JPEG compression are the types of images found in nature. Sharp, contrasting edges are not common in nature, and they do not fair well when JPEG compression is pushed to its limits. Subjects consisting of black lines on a white background degrade rapidly. Similar things such as typefaces and line art are poor subjects for JPEG compression as well. Water, sky and skin can be generously compressed with the minimum of loss and retain their rich, true colors. We humans perceive the images around us in a reasonably well understood way. Science understands the mechanisms of sight and the psychophysics of visual perception. Our brains perform all kinds of tricks to improve our perception of the world around us. For instance, we perceive movies and television like the real thing, even though the movie screen displays a short burst of a still picture followed by a relative eternity of total darkness before the next burst. Our TVs have red, green and blue dots, but we see lots of different colors. I have a retinal condition which is only apparent when reading print, yet I perceive no blind spots when viewing natural scenes, because my brain can predict the missing material and fill in the gaps for me. We perceive small changes in brightness more readily than we do small changes in color. It is this aspect of our perception that JPEG compression exploits in an effort to reduce the demands on our modems and hard drives.
The theory
While most image file formats use an RGB (red, green, blue) value to describe each pixel value, the JPEG format converts this data to luminance (brightness) and chrominance (hue). This allows for separate compression of these two factors. Since the luminance is more important to our senses than the chrominance, the algorithm retains more of the luminance in the compressed file. The JPEG compression algorithm works on individual groups of 8 x 8 pixels. It calculates a Discrete Cosine Transform (DCT) for the entire group, quantizes the DCT coefficients, and then applies a Variable Length Code compression scheme to the coefficients. Neat, huh? It's the quantization step where the loss of color information occurs. And the DCT is the reason why JPEG doesn't do so well on sharp edges. DCT amounts to trying to represent the image as a sum of mathematical curves. That works great on relatively smooth images, not so well on sharp jumps.
Compression Settings
Unfortunately, JPEG compression is offered in a variety of flavors. There is no standard measure of JPEG compression. Each image editing application is free to conceive its own scale. Some, such as Photoshop, apply subjective terms such as "high", "medium" or "low" quality. (There are third-party plug-ins for Photoshop which offer greater control than that, and they're highly recommended since the lowest quality setting offered by Photoshop is often not low enough for web graphics.) Paint Shop Pro for Windows uses a compression scale ranging from 1 to 99, where 99 is the highest compression (lowest quality). Most others use a quality scale ranging from "Q1" to "Q99", where Q99 represents the highest quality (lowest compression). For the examples in this paper, I used the compressionscale of 1 to 99 offered by Paint Shop Pro for Windows. However, to avoid confusion, and since this scale is simply the inverse of the quality scale, I will describe the compression used in the examples using the more popular quality scale. As you will see in the examples that follow, the amount of JPEG compression applied to an image is directly related to the amount of filesize reduction. If the primary purpose of the application of JPEG compression to an image is to reduce filesize, then we need to first determine the amount of compression to be applied. The relative importance of filesize reduction varies from case to case, depending on circumstances. Likewise, the magnitude of allowable image degradation resulting from the compression itself varies from case to case and person to person. This is a very subjective problem. You need to consider the importance and context of each individual image. If you're slapping a bunch of huge photos of your summer vacation on your home page, consider lots and lots of compression. The photos are probably of mediocre quality anyway. Anyway, nobody's going to wait ten minutes for 3 or 4 photos to roll up on their monitor, especially if the subjects are fully-clothed. The same goes for selling toaster ovens or diaper pails. On the other hand, if your website is a photographic exhibition, where the quality of the imagery is the primary focus of the page, then you should use minimal compression, if any. If image quality is paramount, let the viewer wait. It will be worth it. For those large files, consider using the progressive-JPEG format. It'll give the viewer something to look at a lot sooner, even though the quality is not so good.
Examples
This exercise is one that should be used for every graphic element you plan to put on the web. As you analyze each of the following compressions, decide which image you'd put on the web server. I used Paint Shop Pro to convert the images, because I like to use it for quick and simple tasks. It offers compression settings ranging from 1 to 99 on an arbitrary scale. I found this superior to Photoshop's "low," "medium," "high" and "maximum" quality settings. For those using Photoshop, my personal comparisons indicate that the relationship between the two scales is as follows, although your assesment may differ from my own. I have also included the more commonquality scale to the comparison:
Q90 = PSP "10" = Photoshop "maximum"
Example #1: Plastic Fork As we have seen, JPEG compression looks best and offers its greatest reward in filesize reduction when the image content presents subtle color and brightness variations and soft transitions. Abrupt changes and hard edges present a problem for JPEG compression. It doesn't preserve them well, no matter how hard it tries. Therefore it can't reduce the filesize substantially without image loss.
Quality vs. Filesize
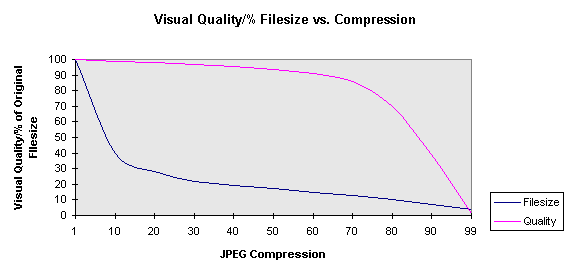
The chart below shows that a small amount of compression has a negligible effect on the image quality, yet a substantial effect on filesize. As we increase the amount of compression, the reduction in filesize is less pronounced, yet the deterioration in image quality becomes more and more noticeable. I determined the "perceived image quality scale" myself. I know it's a stretch, but the compression to perceived visual quality issue is one of the most important topics discussed here. A picture tells a thousand words, and I think it demonstrates the relationship -- quantitatively -- better than words do. I used 100% to represent the visual quality of the least-compressed image and 0% to represent the visual quality of the most highly-compressed image, then placed the others somewhere in between.
Progressive JPEG
The relatively new progressive JPEG is an answer to the popular and widely used interlaced GIF. Like the GIF implementation, a progressive JPEG is transmitted and displayed in a sequence of overlays, with each overlay becoming progressively higher in quality. This feature helps speed up the appearance of your image by sacrificing the initial quality. Try this example to find out whether your browser can read progressive JPEG, and if so whether it actually produces a progressive display (some don't). Note that if you have a fast link to the net, you may not see much progressive effect even if your browser knows how to do it, because p-JPEG decoders are usually set up to skip intermediate display passes if they start falling behind the arriving data.
Introduction | JPEG File Format | GIF File Format | Which Format to Use | Display Types | Tips and Tricks
© Douglas E. Gray.
You can convert RAW, JPG, GIF images, prepare photos for the web with ReaJPEG - batch photo editing software and raw converter. |
News-list:
product updates, new releases
|
|
reaConverter Online
Copyright © 2001-2026 ReaSoft Development.
All rights reserved. Use of this website signifies your agreement to the Online Privacy Policy. |